GLYPH BLE SERVER

This guide will help you configure the GLYPH board as a Bluetooth server and send data to your GLYPH board through a Smart Phone, assuming you are using GLYPH-C3 (but any GLYPH development board from the ESP32 Series should work)
Step 1: Code Setup
- Open Arduino IDE
- Enter the following code into the Arduino IDE
// ESP32 Series BLE Library
#include <BLEDevice.h>
#include <BLEUtils.h>
#include <BLEServer.h>

//UUIDs for the Bluetooth service and characteristic
#define SERVICE_UUID        "4fafc201-1fb5-459e-8fcc-c5c9c331914b"
#define CHARACTERISTIC_UUID "beb5483e-36e1-4688-b7f5-ea07361b26a8"

//Class to handle when a data is received from smart phone
class onReceive: public BLECharacteristicCallbacks {
    void onWrite(BLECharacteristic *pCharacteristic) {
        // Retrieve the value written to the characteristic and Convert to Arduino String
        String value = pCharacteristic->getValue().c_str();

        // If the value length is greater than 0, print it to the Serial Monitor
        if (value.length() > 0) {
            Serial.println("*********");
            Serial.print("New value: ");
            for (int i = 0; i < value.length(); i++)
                Serial.print(value[i]); // Print each character of the received value
            Serial.println();
            Serial.println("*********");
        }
    }
};

void setup() {

    Serial.begin(115200);  // Initialize the Serial Monitor
    // Initialize BLE device with the name "GLYPHC3"
    BLEDevice::init("GLYPHC3");

    // Create a BLE server
    BLEServer *pServer = BLEDevice::createServer();
    // Create a BLE service with the defined UUID
    BLEService *pService = pServer->createService(SERVICE_UUID);
    // Create a BLE characteristic with the defined UUID
    BLECharacteristic *pCharacteristic = pService->createCharacteristic(
                                         CHARACTERISTIC_UUID,
                                         BLECharacteristic::PROPERTY_READ |
                                         BLECharacteristic::PROPERTY_WRITE
                                       );

    // Set the function that as to be called when data is received
    pCharacteristic->setCallbacks(new onReceive());

    // Set an initial value for the characteristic
    pCharacteristic->setValue("Hello World");
    pService->start();  // Start the service

    // Start advertising the BLE service
    BLEAdvertising *pAdvertising = pServer->getAdvertising();
    pAdvertising->start();

    // Print message indicating that the server has started
    Serial.println("BLE Server started, advertising...");
}

void loop() {
    //The main loop doesn't do anything until the data is received by the BLE
    delay(2000);  // Wait for 2 seconds
}
This code is derived and modified from SeeedStudio Xiao ESP32C3
If your Arduino ESP32 Core is not upgraded to version 3.0.0 or above, make sure to update the code:
- Change
String value = pCharacteristic->getValue();tostd::string value = pCharacteristic->getValue();
Step 2: Upload the Code
-
Connect the Board
- Connect your GLYPH board to your computer
-
Select the Board and Port
Do the following setting in your Arduino IDE,
Tools > Boardand select the appropriate board.Tools > Portand select the port connected to your GLYPH.Tools > USB CDC on Bootand select Enabled
If USB CDC on BOOT not enabled, you won't be seeing any serial data on Arduino IDE.
-
Upload the Code
- Click the upload button (➡️ icon) or use the shortcut
CRTL + Uin Arduino IDE to upload the code to the board.
- Click the upload button (➡️ icon) or use the shortcut
Step 3: Download & Install LightBlue App
- Install the App
Step 4: Connect to the Bluetooth Device
-
Open Bluetooth on Your Phone
- Ensure Bluetooth is enabled on your smartphone.
-
Scan for Devices
-
Bring your phone close to the GLYPH board.
-
Scan for devices and locate the GLYPHC3 device.

-
Step 5: Open LightBlue App and Connect
-
Open the LightBlue App
- Launch the LightBlue app on your smartphone.
-
Scan Tab
- Click on the scan tab.
-
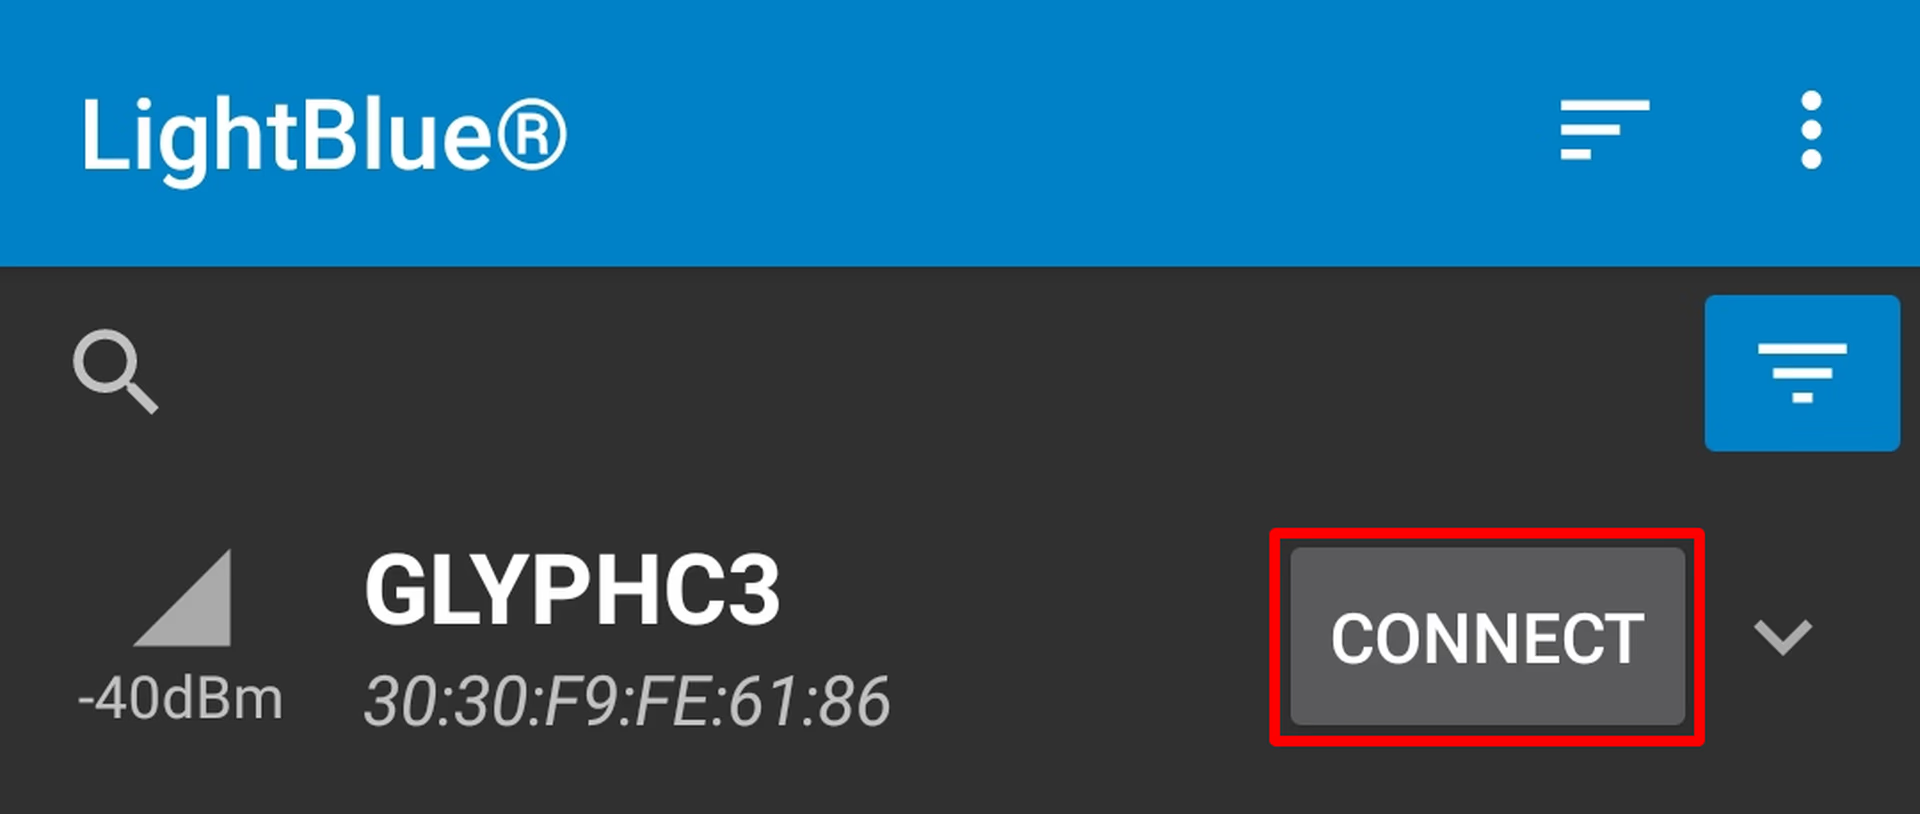
Connect to Device
- Click CONNECT next to GLYPHC3.
- Click CONNECT next to GLYPHC3.
-
Select Readable, Writable Section
- Click on the section at the very bottom which says Readable, Writable.

- Click on the section at the very bottom which says Readable, Writable.
-
Set Data Format
- Under the Data format drop-down menu, select UTF-8 String.

- Under the Data format drop-down menu, select UTF-8 String.
-
Send a Message
- Type any text that you like to send to your GLYPH Board, In this case let's try "PCBCUPID-GLYPHC3" under
WRITTEN VALUESand clickWRITE.

- Type any text that you like to send to your GLYPH Board, In this case let's try "PCBCUPID-GLYPHC3" under
Step 6: View the Output
-
Check the Serial Monitor
- You will see the text string "Hello" output on the Serial Monitor of Arduino IDE.

- You will see the text string "Hello" output on the Serial Monitor of Arduino IDE.